
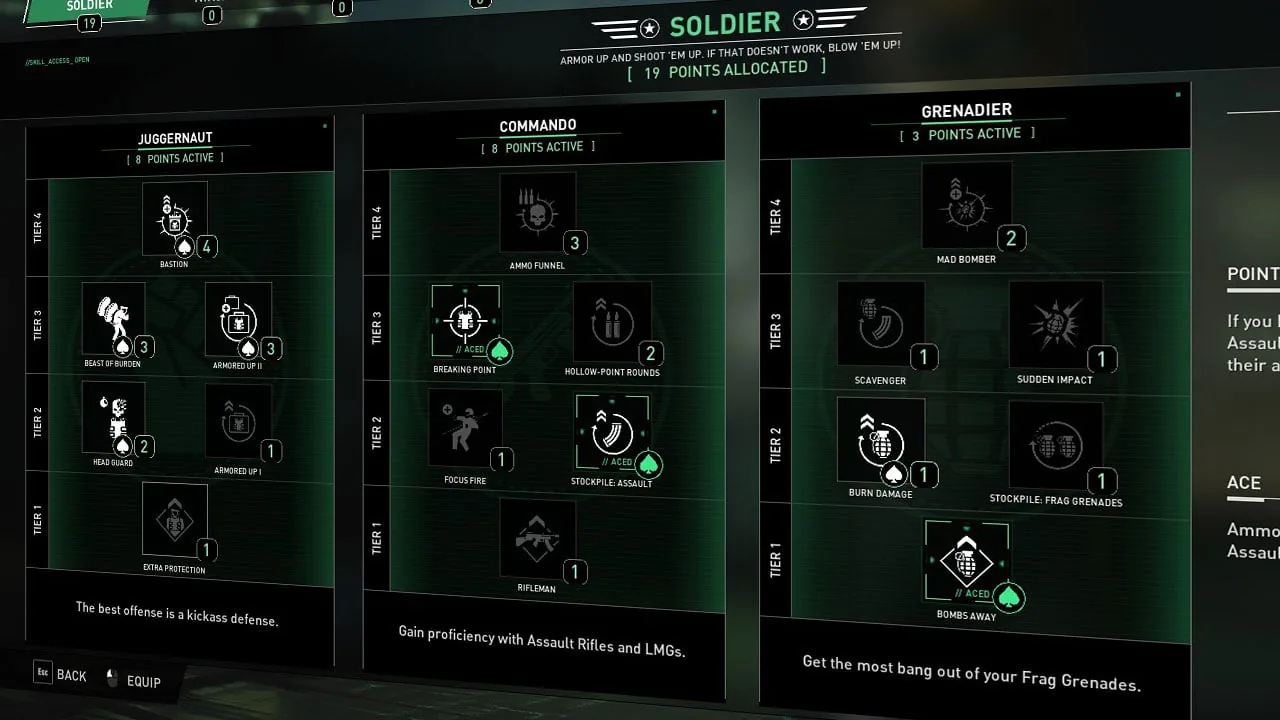
PAYDAY 3 Skills 2.0 gives you up to 51 skill points, with the full pool available at Infamy 150 according to the official release notes. Spend them in the Skill Tree editor, where your equipped choices within a category determine which tiers are available. For a returning player, the quickest way to start is to choose a role and check its main skill in the current tree.
Find the tree and read the skill card
The December 2025 update replaced the previous system with a tiered tree and removed the old Edge, Grit, and Rush buffs. Open the skill editor and look at the category, branch, tier, and the specific Base or Ace selection on the card. When comparing a build with an older video, check all four pieces rather than matching by the skill name alone.
Starbreeze’s release announcement describes tier access in terms of points invested in the category. Spend points in branches that fit your role, then check the current editor’s displayed requirement before choosing a higher-tier card. Pay attention to the exact build budget in the editor when an older preview uses a different unlock rule.
The preview groups picks into Soldier, Mechanic, Professional, Ninja, Hacker, and Conman categories. Decide what function you need, such as reliable access to a camera feed or recovery during fights, before you pick individual upgrades. This makes extra selections on the path to a higher tier useful for the actual heist.
Budget for an unfinished Infamy progression
The maximum is a destination for your setup. Your loadout today should fit the points the game has actually unlocked for your account. If you have fewer than the guide uses, start with the skill that changes the way you handle the objective, then add secondary bonuses as points become available.
The Infamy requirement describes unlocking the full pool, so it is useful when deciding whether a copied build is immediately possible. It is separate from conditions displayed on particular items, branches, and equipment. Check the editor and the item you want to equip separately when planning your next upgrade.
Edit a build without losing track of dependencies
Open the loadout's Skill Tree editor and note your core selections before swapping anything. Remove the optional choices at the edge of the setup first, then watch which tiers remain accessible. If a higher-tier pick disappears, recheck how many points you have invested in the whole category.
Build the revised setup around one primary action you can test. For example, the Spatial Awareness guide gives you a marked Handgun kill as the centerpiece, and its Ace adds a different recovery condition. Test each by observing the result in a suitable run before spending the rest of your points on secondary skills.
Use the separate Base and Ace descriptions when recording a build. A friend copying your setup needs to know whether the skill simply grants access to an interaction or also has its Ace behavior available. This is especially useful if the two of you use different roles and only one is responsible for that interaction.
Treat a branch bonus and a tier prerequisite as separate checks. The October preview puts both Juggernaut and Grenadier in Soldier, so points in Grenadier can help meet a Soldier tier threshold on the way to a Juggernaut pick. A skill that scales with choices specifically in Juggernaut still uses its own branch for that calculation. When you move points between the two, check access to the higher tier and the effect on the skill you came for.
Account for changes made after the tree launched
Starbreeze reworked Playback and Security Expert in update 3.6. Playback became the route for looping footage, while Security Expert gained the camera marking function at Base and the drone hack at Ace. Starbreeze also told players to check the editor because previous selections might need equipping again after the change.
Patch numbers also tell you which version of a guide to use. The December launch update introduced the tree, and update 3.1 shipped the changes from the November survey revision. Pain Tolerance is a useful check for a copied medical build: Base reduces damage to Adrenaline by 25% and requires full health to gain it, while the listed action triggers belong to Ace. If a guide budgets only for Base and expects to earn a reserve from loose cash, revisit the build cost.
This is a practical example of why a current tool description matters. A guide filmed before the switch can describe a real effect with the wrong button or skill for your build. With camera skills, check whether you expect a loop, target marks, or control over a drone before you leave the equipment screen.
Use the official planner before opening a lobby
The official simulator lets you plan choices in a browser. Draft a version that fits your current points, then a version that uses the extra picks you intend to add later. When you transfer the build to the game, verify the final card text and the exact Ace settings there.
A stealth setup is easier to judge if you start from a route. The stealth guide covers the practical choices around unmasked play, camera tools, and guard behavior. Use that information to decide whether you need movement, a way past one camera, or an alternative for a route that goes loud.
For a combat setup, begin with your weapon and the job you do most often. If you need sustained recovery, Adrenaline explains the difference between temporary health, ordinary healing, and armor conditions. If you mostly need damage or ammunition, the build guide offers several different loadout roles to compare.
Troubleshoot a skill that appears to be unlocked
An unlocked node still needs to be equipped in the loadout you bring into the heist. Check your selected loadout before readying up, then read the current wording of the skill and its Ace. If a skill checks the weapon class, the target state, or your health, a correctly spent point will still do nothing until the other requirements are satisfied.
Try one controlled action so you can spot the difference in the HUD or objective prompt. If you swap a skill, weapon, and armor frame all at once, an improvement is hard to attribute to any one of them. Change one part at a time and keep the same heist and difficulty until the intended behavior is clear.
As of 3.10.1, you can use the Shooting Range introduced in update 3.9 to compare equipped loadouts at the same distance. Keep the weapon, perk, and target distance fixed when comparing a damage skill, then switch the loadout and repeat. Move the test into a heist for conditions involving the crew or civilian behavior, such as a teammate using your Medic Bag.
A skill tree is easier to maintain when the role that justified it remains obvious. Write down the action or condition that each important node serves, then revisit the list after a major update. If your current role changes from camera control to combat recovery, the same plan tells you which points can move and which choices still matter.
Save and share a PAYDAY 3 build
Open the official PAYDAY 3 builder and start with a blank tree or a saved build link. Select the Base and Ace cards you need and check the remaining points and tier access before saving. Use the simulator’s share feature to copy the full link, including the part after the number sign, and reopen it before sending it to a friend. Starbreeze describes it as a skill planner; keep the weapon, armor, tool and equipment list with the link so the full loadout can be copied in game. Starbreeze’s simulator announcement
When opening an older link, check the core nodes against the in-game tree and your Infamy before using the build. Playback and Security Expert changed places and behavior in 3.6, so a familiar link may need those nodes reselected. If a link loses the saved selection, ask for the complete address or rebuild the skill list from its text. 3.6 camera skill changes